If you are using ictime the first time, this chapter of our documentation should help you to understand some concepts of ictime. However, you do not need to perform all these steps in this order and can do and modify settings at any time.
If after sucessful installation of ictime, you do not see any ictime menu in the JIRA navigation bar, first have a look here: Check Permission Setup
1. General Configuration
This configuration screen is located in the administration section of JIRA and can be accessed by all JIRA administrators. All other configuration options are accessible via the ictime navigation in the JIRA navigation bar. Access to these features depends on ictime permissions (see below, Check Permissions).
As a first step, review the general settings for ictime and decide if the default configuration is okay for you. If you decide to deactivate features, you can skip some of the following steps.
Navigate to the Add-ons section in the JIRA administration and go to "Manage add-ons". Select ictime in the list of add-ons and click on the "Configure" button. Alternatively, use the ictime menu in the JIRA navigation bar, click an "Adminsitration" and then on "General Configuration".
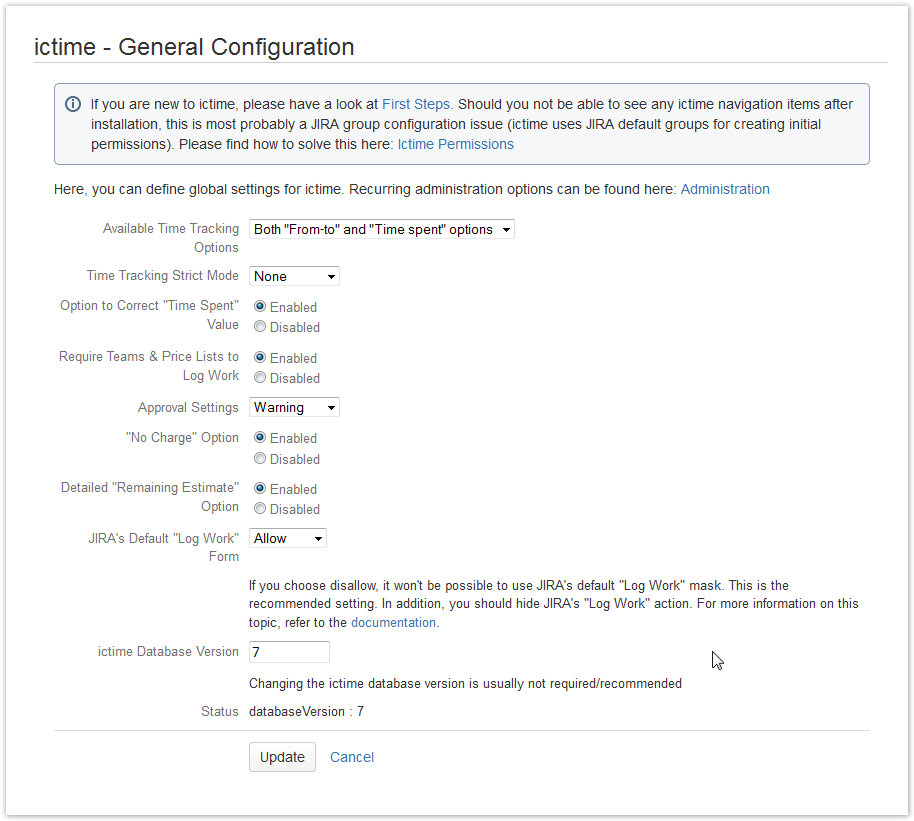
Make the changes you need and save.
Read the detailed documentation here: General Configuration
2.Disable JIRA's "Log Work" Screen
ictime adds it's own, separate "Log Work" dialogue, in addition to the existing one from JIRA. In order to avoid confusion arising from having two different screens to log work - one from ictime, one from JIRA - we offer the following two options on the general configuration screen (see above):
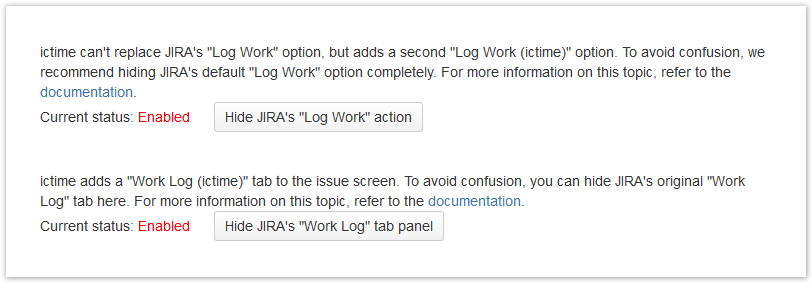
We recommend that you disable/hide JIRA's "Log Work" action as well as JIRA's "Work Log" tab.
Read the detailed documentation here: General Configuration
4. Administration
All administration & configuration options of ictime that are used more frequently are accesible via the "Administration" link in the ictime menu in the JIRA navigation bar.

ictime's administration section is divided into a couple of subitems:

Permissions
ictime permissions are configured based on JIRA groups. ictime ships with a default permission setup that grants members of the jira-administrators group full access to all ictime features and gives members of the jira-developers group access to a few features like timesheets etc.
You should check if the initial permission setup has been automatically performed (= as member of the "jira-administrators" group, you can see all ictime navigation items), and if yes, review the permission setup and change it according to your needs.
There are a couple of scenarios where the default permission setup of ictime does not work, i.e. you won't be able to access all ictime navigation items (or even won't see any ictime navigation menu in the JIRA navigation bar at all):
- If the JIRA groups jira-developers and jira-administrators did not exist in your JIRA installation at the time of installation if ictime (it does not help to create them after installation of ictime!)
- If your user is not assigned to one of this groups (specifically to jira-administrators in order to have full access to ictime administration options)
- If something fails when creating the initial permission setup on installation in your JIRA database and no permissions are created or permissions are only partly created.
In these cases proceed according to one of the following recommendations:
- If the JIRA groups do not exist, create a new group in JIRA with the name "ictime-lifesaver". Assign yourself to this group. You will now get access to the ictime "Permissions" screen and can set the permissions in accordance with your needs.
- If the JIRA groups exist, but you are not assigned, assign yourself to the group "jira-administrators", if possible.
- If your JIRA group configuration looks okay but something seems to have failed on initial creation of permissions, proceed like described under #1, i.e. create and use the "ictime-lifesaver" group.
Read the detailed documentation here: ictime Permissions
Activity Types
Activity types are an (optional) feature to further classify your work logs. If you want to use this feature, just create the activity types you need and they will be available for all your projects (you will also be able to limit activity types to selected ones on a per project base). You find the activity types in the ictime navigation menu:
You also have the option to completely deactivate activity types here (don't skip this step if you don't need activity types, but deactivate them).
Read the detailed documentation here: Configure Activity Types and Project Activity Types.
Rounding Rules
If you have projects where you want to track time exactly as a time-span (with start/end time), but do not want to charge your clients the exact amount of time, but a rounded amount (like 15 minutes, 30 minutes etc.), you can define rounding rules. All rules you have defined will be available on project level. You find the rounding rules in the ictime navigation menu:
If you don't need rounding, skip this step.
Read the detailed documentation here: Configure Rounding Rules and Project Rounding Rule.
Global Teams & Price Lists
ictime allows you to control who is able to log work via teams, and via price lists, you can set rates for the work of a team. You have the choice whether you want to work with global teams and price lists that can be assigned to specific projects or if you want to create your teams and price lists for each project (you also can mix both approaches!). You find the global teams and price lists in the ictime navigation menu:
You can skip this step if you have decided to globally deactivate team & price list checks in the add-on configuration (step 1, Add-on Configuration).
Read the detailed documentation here: Configure Global Teams & Price Lists.
5. Configure Projects
Project configuration contains a couple of configuration options that should help you to efficiently use ictime:
- Set a project status (to be able to deactivate or close projects for time tracking).
- Set a project currency (for your financial reports).
- Select a rounding rule (if you have decided to create rounding rules in step 4).
- Create project-specific teams and price lists (to control who can log work and to price your work) or assign one or more global teams (if you have decided to create global teams & price lists in step 5).
- Select those activity types you want to use for this project (if you have decided to work with activity types in step 3) or just use all.
You find the project configuration in the ictime navigation menu:
All this is optional. The only thing you really need to do (if you did not decide to globally deactivate team & price list checks in step 1) is creating teams and price lists (or assigning a global team if you have created one or more in step 5).
Read the detailed documentation here: Project Configuration
6. Do you need to log work on other screens?
Sometimes it makes sense to offer the option to log work not only as a separate feature, but also integrated into other screens, like e.g. workflow transition screens (resolve, close). For this, you need to replace the original JIRA "Log work" field with a custom "Log work ictime" field - if you don't do that and go on using the original JIRA field, you will be able to log work on such screens, but without any of the additional ictime features.
Read the detailed documentation here: Custom Log Work Field.
7. Log Work
Once you have configured ictime and your projects according to your needs, users can start to log work. Usually, ictime offers a couple of places where you can log work:
- Via the JIRA issue screen:

(on this screen, in fact there are multiple places where you can log work) - Via the JIRA navigation:

- Via your timesheet:

Read the detailed documentation here: Log Work (Issue Screen)
8. My Timesheet
Once you have started to log work, your timesheet is a central place to manage your existing work logs. You just get there via the ictime navigation:

Read the detailed documentation here: My Timesheet
9. Reporting & Accounting
Once you have started to use ictime for logging work, administrative users can manage work logs of all users via the reporting options of ictime, from running reports, editing or moving work logs to approval, exporting data, charging work logs etc. You just get there via the ictime navigation:

Read the detailed documentation here: Reporting and Accounting.
10. Time & Date Settings in JIRA?
JIRA has a rather complex way of defining time & date settings for different purposes at different places. Even though misconfigurations frequently do not cause visible trouble in JIRA, ictime - due to the fact that time & date is essential for work logs - might show problems (error messages or time is not calculated correctly when using start/end time etc.) if settings are not okay. Please have a quick look at Time & Date Settings.